Computer Vision in the browser
Deep dive into how to run computer vision models in the browser using TensorFlow.js and YOLOv8 pose estimation model.
I have recently started practicing Kettlebell Sport. One of the main modalities is Long Cycle, where athletes must complete as many Clean & Jerk repetitions as possible within 10 minutes without putting the bells down. This technical lift requires intense focus on form and technique, making it nearly impossible to count repetitions in real-time.
This got me thinking: there must be a way to use machine learning models to analyze images and videos in real-time, and there must be a way to run them directly in the browser.
In this post, I will show you how to run a computer vision model in the browser using TensorFlow.js and the YOLOv8 pose estimation model.
Table of Contents
- Bringing machine learning to the browser
- Loading the model
- Input processing
- Output processing
- Letterboxing and scaling
- A quick note on memory management
- Putting it all together: live video
Bringing machine learning to the browser
When I first started looking at computer vision technologies, I wanted something that could run on the user’s device. This has some obvious advantages:
- It is free.
- It doesn’t require a backend.
- The data stays with the user.
The first model I came across was Ultralytics YOLOv8, a popular, open-source object detection and image segmentation model, which among many other things, supports human keypoint detection with its dedicated pose model. The choice was pretty obvious.
Then I needed to be able to run the model in the browser. Fortunately, Ultralytics offers a wide range of options for exporting a trained model to different formats, from which I chose TensorFlow.js, a library that lets us use machine learning models in the browser or Node.js.
Loading the model
In order to load the model, we first need the appropriate format. You can find it online, but let’s go ahead and export it ourselves using Ultralytics:
pip install ultralytics
yolo export model=yolov8n-pose.pt format=tfjs
Once we have the model export, we can easily load it using @tensorflow/tfjs:
import { loadGraphModel } from "@tensorflow/tfjs";

async function main() {
  const modelURL = "/yolov8n-pose_web_model/model.json";
  const model = await loadGraphModel(modelURL);
}

main();
And it’s done—we can now start using the model.
Input processing
Before continuing, let’s review some concepts so we can understand what we are doing:
-
TensorFlow is a library that allows us to define and perform operations with tensors.
-
A tensor is a multidimensional array and it can have several dimensions or ranks. A 1D tensor is like a vector, a 2D tensor is equivalent to a matrix, a 3D tensor would look like a cube, a 4D one like a stack of cubes, and so on.
-
Tensors have a shape which defines the dimensions of the tensor. For example, a tensor of shape
[20, 20, 3]is a tensor with 3 dimensions which have 20, 20, and 3 indices respectively. If that was representing a 2D image, we could say that the first dimension is the height (Y axis), the second one the width (X axis), and the third one the color channels (RGB). Note that TensorFlow.js follows the height-width convention. The following tensor of shape[2, 2, 3]represents a 2x2 image with a checker pattern:[ [[0,0,0], [1,1,1]], [[1,1,1], [0,0,0]] ] -
Models come with an input shape and an output shape, which will dictate how the data must be sent and how the result must be interpreted.
Having this in mind, let’s use TensorFlow to create a tensor from an image and have a look at the different tensor shapes we will be dealing with:
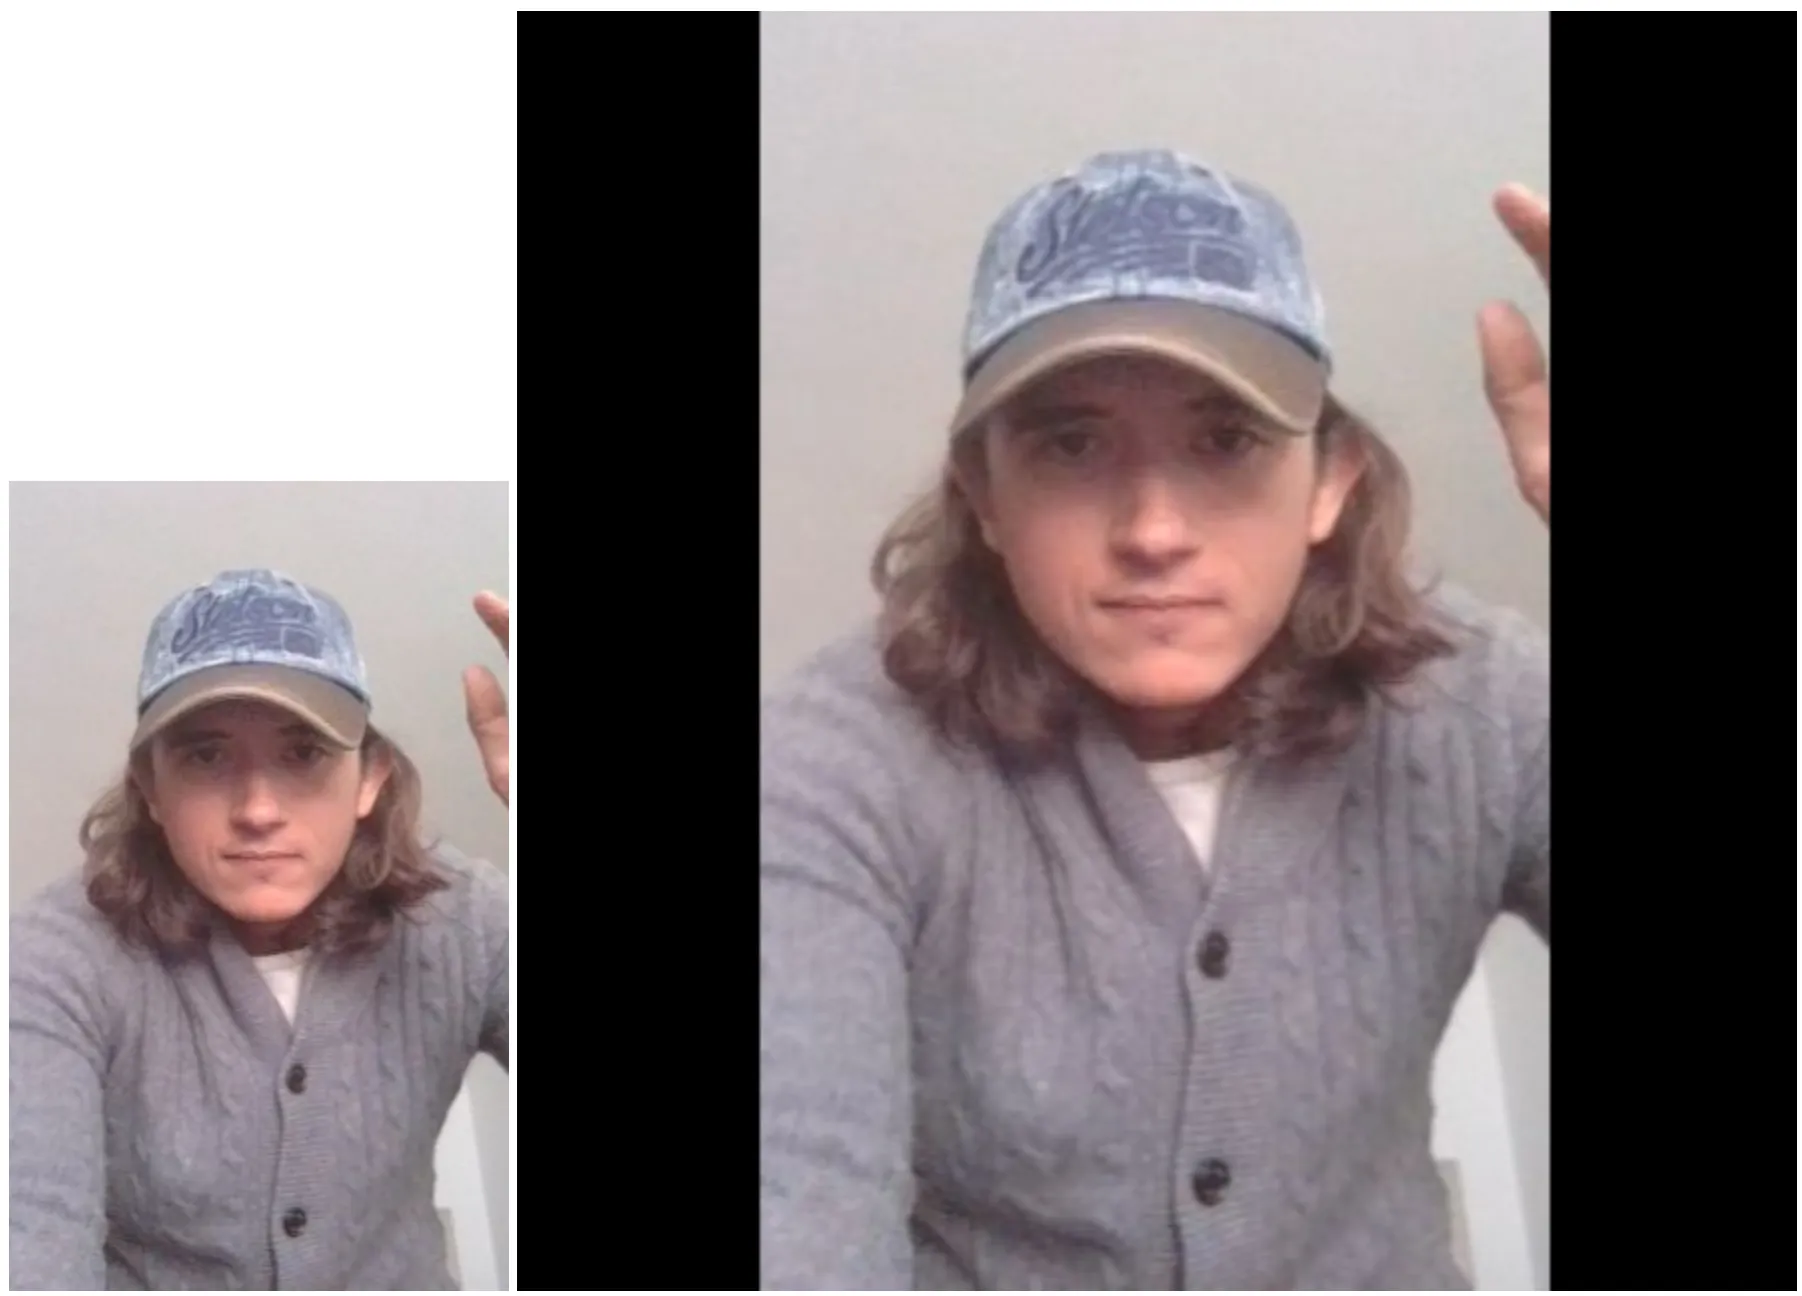
<img
  src="https://isidrok.github.io/computer-vision-web/432x432.jpg"
  alt=""
  crossorigin="anonymous"
/>
<canvas></canvas>
import {
loadGraphModel,
browser as tfBrowser,
dispose,
} from "@tensorflow/tfjs";
async function main() {
const image = document.querySelector("img")!;
const canvas = document.querySelector("canvas")!;
const modelURL = "/yolov8n-pose_web_model/model.json";
const model = await loadGraphModel(modelURL);
const modelShape = model.inputs[0].shape!;
console.log("Model input shape:", modelShape);
// [1, 640, 640, 3]
const imageTensor = tfBrowser.fromPixels(image);
console.log("Image shape:", imageTensor.shape);
// [432, 432, 3]
dispose([imageTensor]); // Don't forget to clean up
}
main();As you can see, the model expects an input of shape [1, 640, 640, 3], which means a batch of 1 image with a height and width of 640 pixels and 3 color channels (RGB). Another interesting fact is that most models work with values between 0 and 1. The image we are using has a shape of [432, 432, 3], and each value is between 0 and 255, so we need to:
- Add the batch dimension.
- Normalize the image values by dividing them by 255.
- Resize the image so it matches the model input size.
Let’s take care of that. In this improved version, we’ll also use TensorFlow’s tidy function for better memory management, it will automatically dispose of the tensors created within its scope:
import {
loadGraphModel,
browser as tfBrowser,
tidy,
type Tensor3D,
} from "@tensorflow/tfjs";
function processImage(image: HTMLImageElement, model: GraphModel) {
const modelShape = model.inputs[0].shape!;
const [modelHeight, modelWidth] = modelShape.slice(1, 3);
console.log("Model input shape:", modelShape);
// [1, 640, 640, 3]
const imageTensor = tfBrowser.fromPixels(image);
console.log("Image shape:", imageTensor.shape);
// [432, 432, 3]
const processedImage = imageTensor
.expandDims(0) // Add batch dimension
.toFloat() // Convert to float32
.div(255) // Normalize to [0, 1]
.resizeBilinear([modelHeight, modelWidth]); // Resize to model input shape
console.log("Processed image shape:", processedImage.shape);
// [1, 640, 640, 3]
return processedImage;
}
async function main() {
const image = document.querySelector("img")!;
const canvas = document.querySelector("canvas")!;
const modelURL = "/yolov8n-pose_web_model/model.json";
const model = await loadGraphModel(modelURL);
// We can use tidy to automatically dispose of tensors created within its scope
tidy(() => {
const modelShape = model.inputs[0].shape!;
const [modelHeight, modelWidth] = modelShape.slice(1, 3);
const processedImage = processImage(image, model);
canvas.height = modelHeight;
canvas.width = modelWidth;
// Remove the batch dimension so the image can be rendered
tfBrowser.toPixels(processedImage.squeeze<Tensor3D>([0]), canvas);
});
}
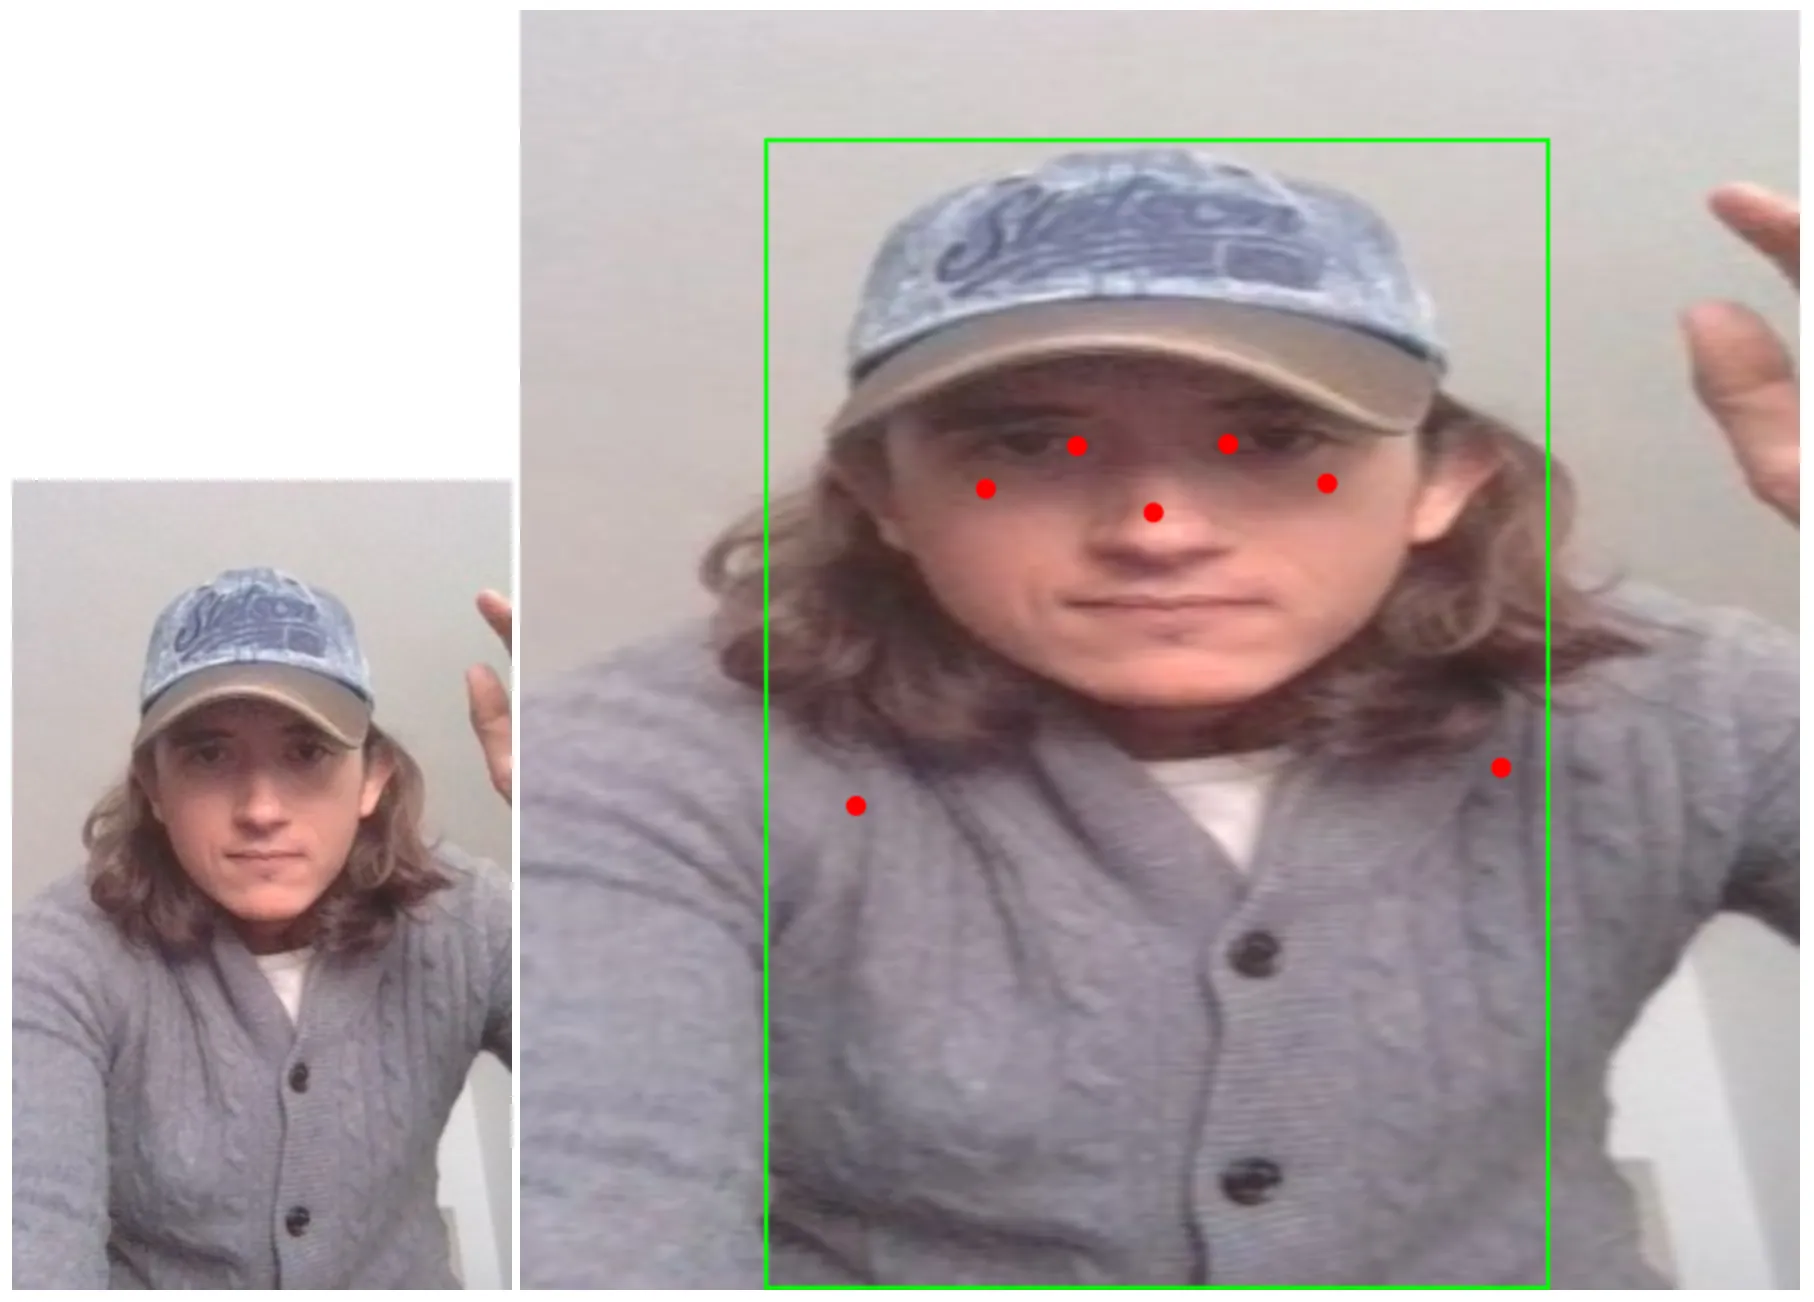
main();After processing the image, we can see that the shape is now [1, 640, 640, 3], which is what the model expects. Rendering the image on the canvas will show the resized image:
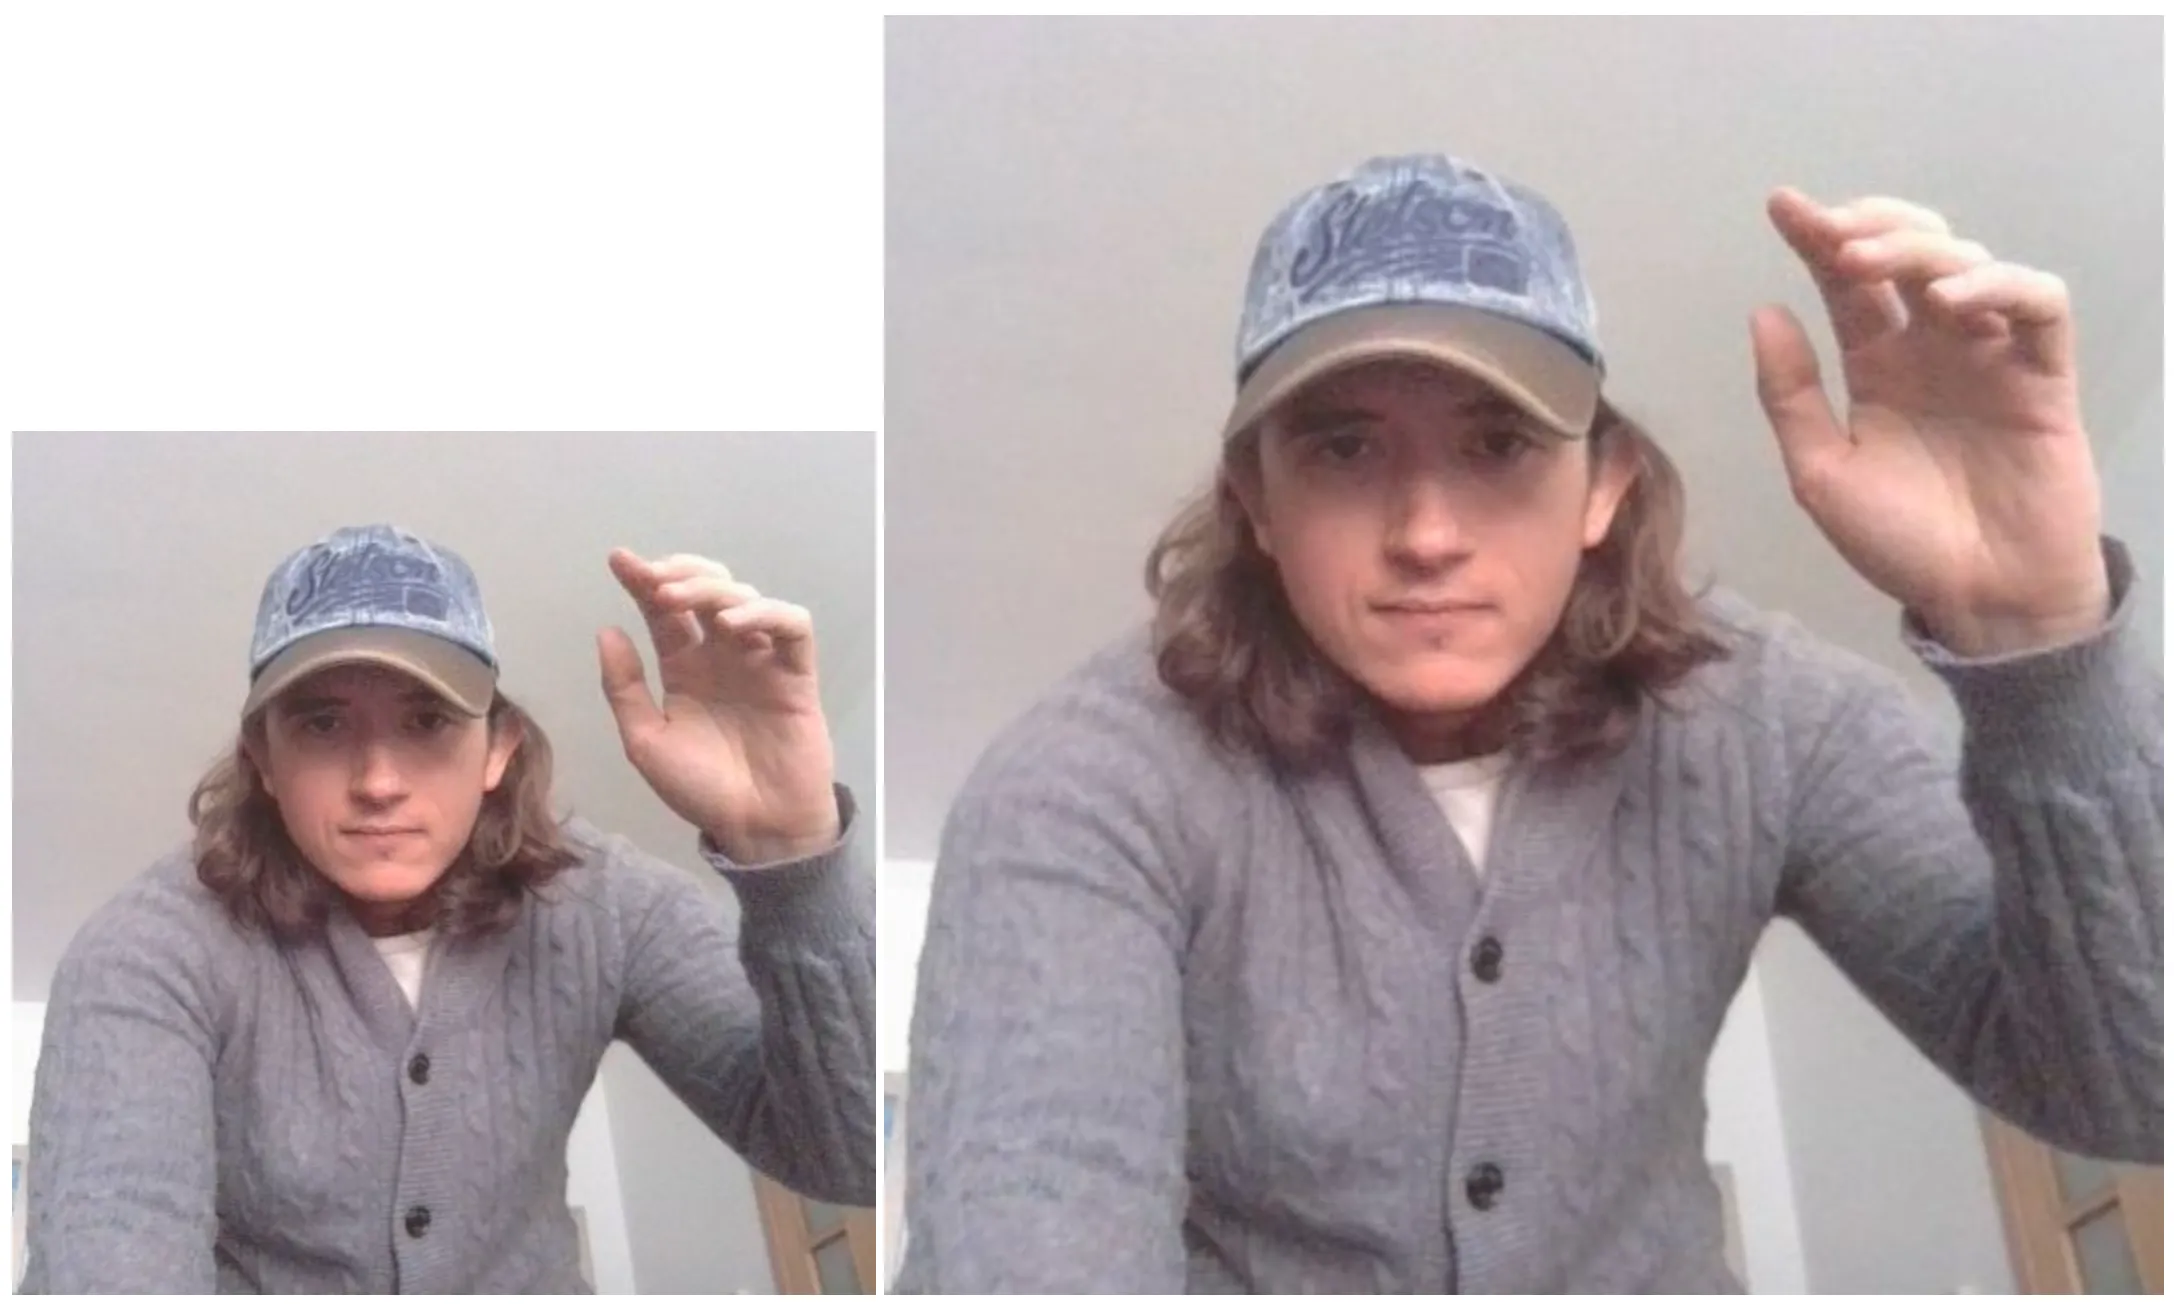
If the image aspect ratio is different from the model input size, the image will be distorted. In this case we are using a square image so it works fine, but check the live demo to see what happens with images of different aspect ratios. We will later see how to apply letterboxing to avoid this distortion, but now let’s move on to processing the image with the model.
Output processing
Once we have the processed image, we can run it through the model and get the output:
// ... previous code
const predictions = model.predict(processedImage) as Tensor3D;
console.log(predictions.shape);
// [1, 56, 8400]
The output shape is [1, 56, 8400]:
- 1: batch size, the model has done 1 prediction on a single image.
- 56: channels, the model outputs 56 values per detection, which includes the person box (x, y, width, height, confidence), and the 17 keypoints or body parts (x, y, confidence).
- 8400: the number of detections made.
We could represent the output in the following table:
| Channel | Pred 1 | … | Pred 8400 |
|---|---|---|---|
| x | 320 | … | 100 |
| y | 240 | … | 120 |
| w | 100 | … | 80 |
| h | 200 | … | 90 |
| conf | 0.92 | … | 0.85 |
| kpt1_x | 330 | … | 110 |
| kpt1_y | 250 | … | 130 |
| kpt1_c | 0.80 | … | 0.70 |
| kpt2_x | 340 | … | 120 |
| kpt2_y | 260 | … | 140 |
| kpt2_c | 0.75 | … | 0.65 |
| … | … | … | … |
| kpt17_x | 350 | … | 130 |
| kpt17_y | 270 | … | 150 |
| kpt17_c | 0.70 | … | 0.60 |
To make sense of the output, we are going to:
- Transpose the tensor from
[1, 56, 8400]to[1, 8400, 56]. This will make working with predictions easier. - Extract and convert the box coordinates from center
(x, y)and size(w, h)to corner coordinates(x1, y1, x2, y2). - Extract the confidence scores and find the best detection.
- Return the data for the best detection, which includes the box coordinates and the keypoints.
function getBestPrediction(predictions: Tensor3D): Promise<{
  box: [number, number, number, number];
  score: number;
  keypoints: [number, number, number][];
}> {
  // Reshape predictions from [1, 56, 8400] to [1, 8400, 56] for easier processing
  // Each of the 8400 predictions now has 56 values: [x, y, w, h, conf, kpt1_x, kpt1_y, kpt1_c, ...]
  const reshapedPredictions = predictions.transpose([0, 2, 1]);

  // Extract bounding box components (center format: x, y, width, height)
  const centerX = slice(reshapedPredictions, [0, 0, 0], [-1, -1, 1]);
  const centerY = slice(reshapedPredictions, [0, 0, 1], [-1, -1, 1]);
  const width = slice(reshapedPredictions, [0, 0, 2], [-1, -1, 1]);
  const height = slice(reshapedPredictions, [0, 0, 3], [-1, -1, 1]);

  // Convert from center format to corner format (x1, y1, x2, y2)
  const halfWidth = div(width, 2);
  const halfHeight = div(height, 2);
  const x1 = sub(centerX, halfWidth);
  const y1 = sub(centerY, halfHeight);
  const x2 = add(centerX, halfWidth);
  const y2 = add(centerY, halfHeight);

  // Extract confidence scores and keypoints
  const confidenceScores = slice(reshapedPredictions, [0, 0, 4], [-1, -1, 1]);
  const allKeypoints = slice(reshapedPredictions, [0, 0, 5], [-1, -1, -1]); // All remaining 51 values (17 keypts × 3)

  // Find the prediction with highest confidence
  const scoresArray = confidenceScores.dataSync();
  const bestPredictionIndex = scoresArray.indexOf(Math.max(...scoresArray));
  const bestConfidence = scoresArray[bestPredictionIndex];

  // Extract the best bounding box [x1, y1, x2, y2]
  const bestBoundingBox = squeeze(
    concat(
      [
        slice(x1, [0, bestPredictionIndex, 0], [1, 1, 1]),
        slice(y1, [0, bestPredictionIndex, 0], [1, 1, 1]),
        slice(x2, [0, bestPredictionIndex, 0], [1, 1, 1]),
        slice(y2, [0, bestPredictionIndex, 0], [1, 1, 1]),
      ],
      2
    )
  );

  // Extract the best keypoints (51 values: 17 keypoints × 3 values each)
  const bestKeypointsTensor = squeeze(
    slice(allKeypoints, [0, bestPredictionIndex, 0], [1, 1, -1])
  );

  // Convert keypoints tensor to array and group into [x, y, confidence] triplets
  const keypointsData = [...bestKeypointsTensor.dataSync()];
  const formattedKeypoints: [number, number, number][] = [];

  for (let i = 0; i < keypointsData.length; i += 3) {
    const x = keypointsData[i];
    const y = keypointsData[i + 1];
    const confidence = keypointsData[i + 2];
    formattedKeypoints.push([x, y, confidence]);
  }
  const boxData = [...bestBoundingBox.dataSync()] as [
    number,
    number,
    number,
    number
  ];

  return {
    box: boxData,
    score: bestConfidence,
    keypoints: formattedKeypoints,
  };
}
Finally, after calculating the best prediction, we can render the bounding box and keypoints on the canvas:
function renderPrediction(props: {
  canvas: HTMLCanvasElement;
  score: number;
  box: [number, number, number, number];
  keypoints: [number, number, number][];
  width: number;
  height: number;
  source: HTMLImageElement;
}) {
  const threshold = 0.5;
  const { canvas, box, keypoints, width, height, source, score } = props;
  if (score < threshold) {
    return;
  }
  canvas.width = width;
  canvas.height = height;
  const ctx = canvas.getContext("2d")!;
  ctx.clearRect(0, 0, width, height);
  ctx.drawImage(source, 0, 0, width, height);

  // Draw bounding box
  const [x1, y1, x2, y2] = box;
  ctx.strokeStyle = "lime";
  ctx.lineWidth = 2;
  ctx.strokeRect(x1, y1, x2 - x1, y2 - y1);

  // Draw keypoints
  for (const [x, y, c] of keypoints) {
    if (c > threshold) {
      ctx.beginPath();
      ctx.arc(x, y, 5, 0, 2 * Math.PI);
      ctx.fillStyle = "red";
      ctx.fill();
    }
  }
}
Putting it all together, we can now run the model on an image and render the results:
async function main() {
  const image = document.querySelector("img")!;
  const canvas = document.querySelector("canvas")!;
  const modelURL = "/yolov8n-pose_web_model/model.json";
  const model = await loadGraphModel(modelURL);
  const modelShape = model.inputs[0].shape!;
  const [modelHeight, modelWidth] = modelShape.slice(1, 3);
  const processedImage = processImage(image, model);
  const predictions = model.predict(processedImage) as Tensor3D;
  const bestPrediction = getBestPrediction(predictions);

  renderPrediction({
    canvas,
    source: image,
    ...bestPrediction,
    // replace with image.width and image.height
    // if you want to render on original image
    width: modelWidth,
    height: modelHeight,
  });
}
main();
Here is the result of running the model on the previous image:
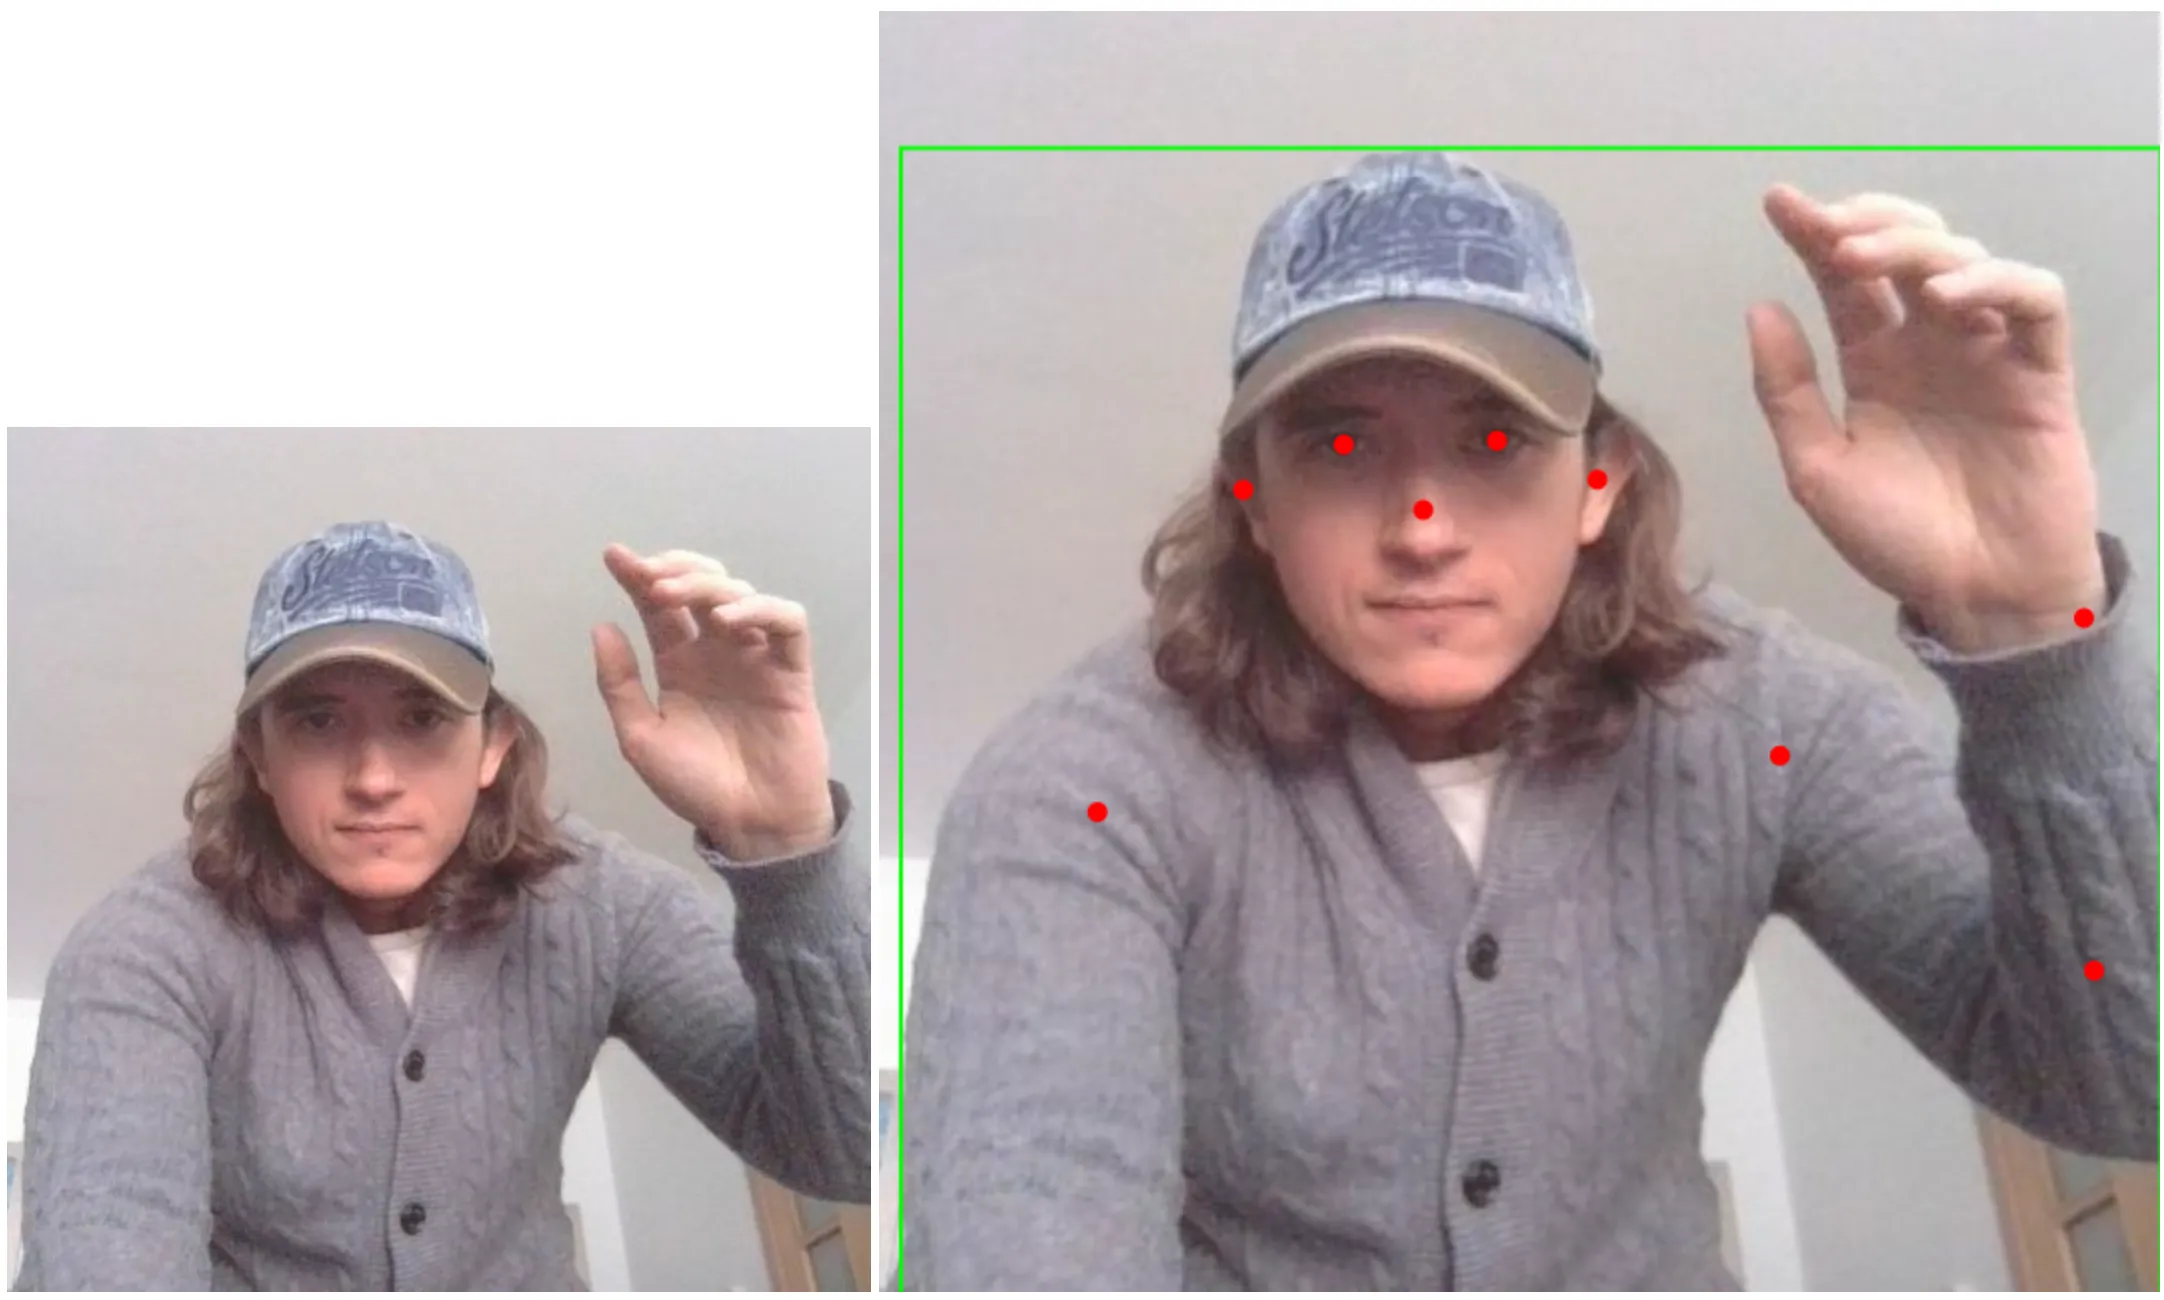
There are still two things to consider:
-
We cannot render the predictions on the original image because they are relative to the model input size.
-
If the image aspect ratio is different from the model input size, the image will be distorted.
Let’s apply letterboxing and scaling transformations to the model output to avoid these issues.
Letterboxing and scaling
Letterboxing is a technique used in video and film to display widescreen content on standard-width screens without distorting the image by adding black bars to the top and bottom or sides of the image. In our case, we will use it to maintain the aspect ratio of the original image while resizing it to fit the model input size.
To do so, we will need to calculate which is the largest dimension of the image that can fit into the model input size, and then calculate the letterbox size to fill the remaining space. This will allow us to resize the image without distorting it.
function processImageWithLetterboxing(
  image: HTMLImageElement,
  model: GraphModel
) {
  // Get model's expected input dimensions
  const modelInputShape = model.inputs[0].shape!;
  const [modelHeight, modelWidth] = modelInputShape.slice(1, 3);

  // Convert image to tensor and normalize to [0, 1]
  const originalImageTensor = tfBrowser.fromPixels(image).toFloat().div(255);

  // Step 1: Calculate letterboxing parameters
  // Find the larger dimension to determine the target square size
  const originalWidth = image.width;
  const originalHeight = image.height;
  const targetSquareSize = Math.max(originalWidth, originalHeight);

  // Calculate how much padding is needed on each axis
  const totalWidthPadding = targetSquareSize - originalWidth;
  const totalHeightPadding = targetSquareSize - originalHeight;

  // Distribute padding equally on both sides (center the image)
  const leftPadding = Math.floor(totalWidthPadding / 2);
  const rightPadding = totalWidthPadding - leftPadding;
  const topPadding = Math.floor(totalHeightPadding / 2);
  const bottomPadding = totalHeightPadding - topPadding;

  console.log(`Original: ${originalWidth}x${originalHeight}`);
  // Original: 250x405
  console.log(`Target square: ${targetSquareSize}x${targetSquareSize}`);
  // Target square: 405x405
  console.log(
    `Padding: top=${topPadding}, bottom=${bottomPadding}, left=${leftPadding}, right=${rightPadding}`
  );
  // Padding: top=0, bottom=0, left=77, right=78

  // Step 2: Apply letterboxing by adding padding (creates black bars)
  const letterboxedImage = originalImageTensor.pad<Tensor3D>([
    [topPadding, bottomPadding], // Height padding
    [leftPadding, rightPadding], // Width padding
    [0, 0], // No channel padding
  ]);

  // Step 3: Resize the square image to model input size
  const resizedImage = letterboxedImage.resizeBilinear<Tensor3D>([
    modelHeight,
    modelWidth,
  ]);

  // Step 4: Add batch dimension for model input [1, height, width, channels]
  const batchedImage = resizedImage.expandDims(0);

  return batchedImage;
}
Let’s try it out:
// ... previous code
const processedImage = processImageWithLetterboxing(image, model);
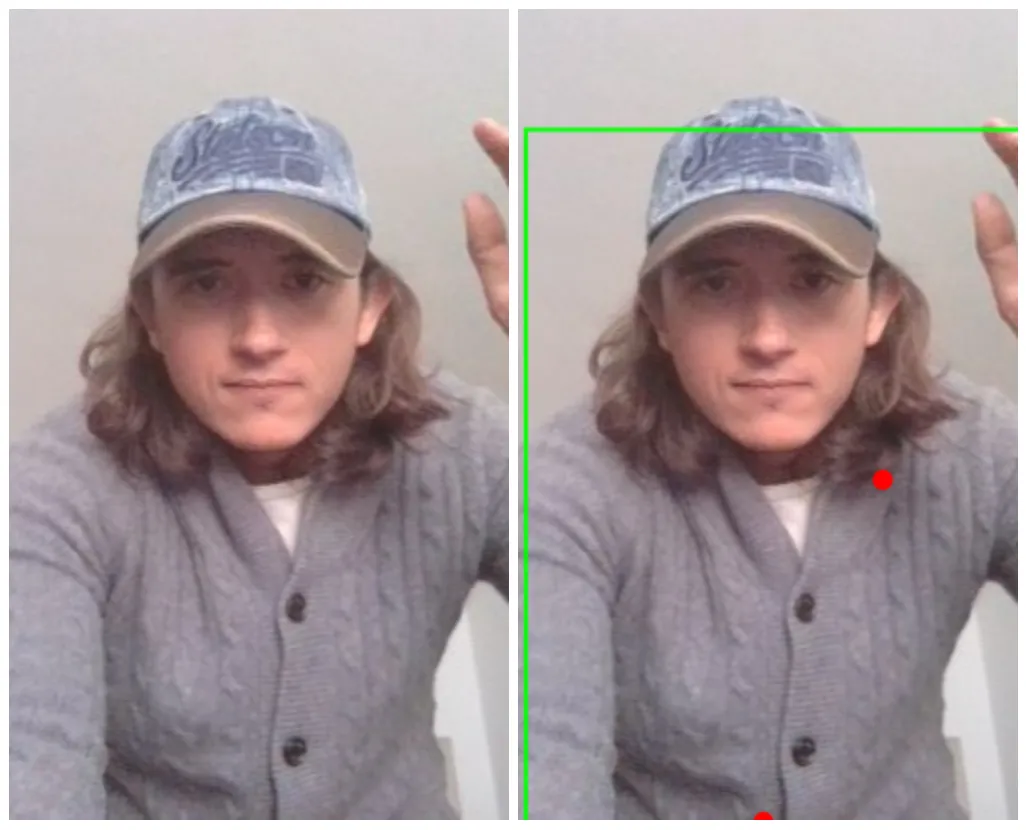
tfBrowser.toPixels(processedImage.squeeze<Tensor3D>([0]), canvas);Now the image is resized without distortion and padded with black bars to fit the model input size.
The predictions are still relative to the model input size, so we need to scale them back to the original image size.
We need to modify the processImageWithLetterboxing function to return the vertical and horizontal padding values as well as the scale factor, so we can use them to scale the predictions back to the original image size:
function processImageWithLetterboxing(
  image: HTMLImageElement,
  model: GraphModel
) {
  // ... previous code

  // Calculate transformation parameters for mapping predictions back to original coordinates
  const scale = targetSquareSize / modelWidth; // Scale factor to map from model space back to letterboxed space
  const xOffset = leftPadding; // X displacement caused by letterboxing
  const yOffset = topPadding; // Y displacement caused by letterboxing

  console.log(
    `Transformation - scale: ${scale}, xOffset: ${xOffset}, yOffset: ${yOffset}`
  );
  // Transformation - scale: 0.6328125, xOffset: 77, yOffset: 0

  // ... previous code
  return {
    processedImage: batchedImage,
    transformParams: {
      scale,
      xOffset,
      yOffset,
      originalWidth,
      originalHeight,
    },
  };
}
Finally, we will create a function scalePrediction that will scale the predictions back to the original image size by multiplying the coordinates by the scale factor and subtracting the offsets:
function transformCoordinate(
coord: number,
scale: number,
offset: number
): number {
// Transform coordinates from model space back to original image space
return coord * scale - offset;
}
function scalePrediction(
prediction: {
box: [number, number, number, number];
score: number;
keypoints: [number, number, number][];
},
transformParams: {
scale: number;
xOffset: number;
yOffset: number;
}
) {
const { scale, xOffset, yOffset } = transformParams;
// Transform bounding box coordinates
const [modelX1, modelY1, modelX2, modelY2] = prediction.box;
const scaledBox: [number, number, number, number] = [
transformCoordinate(modelX1, scale, xOffset),
transformCoordinate(modelY1, scale, yOffset),
transformCoordinate(modelX2, scale, xOffset),
transformCoordinate(modelY2, scale, yOffset),
];
// Transform keypoint coordinates
const scaledKeypoints: [number, number, number][] = prediction.keypoints.map(
([x, y, confidence]) => [
transformCoordinate(x, scale, xOffset),
transformCoordinate(y, scale, yOffset),
confidence,
]
);
return {
box: scaledBox,
score: prediction.score,
keypoints: scaledKeypoints,
};
}
async function main() {
// ... previous code
const { processedImage, transformParams } = processImageWithLetterboxing(
image,
model
);
const predictions = model.predict(processedImage) as Tensor3D;
const bestPrediction = getBestPrediction(predictions);
const scaledPrediction = scalePrediction(bestPrediction, transformParams);
renderPrediction({
canvas,
source: image,
...scaledPrediction,
width: transformParams.originalWidth,
height: transformParams.originalHeight,
});
// ... previous code
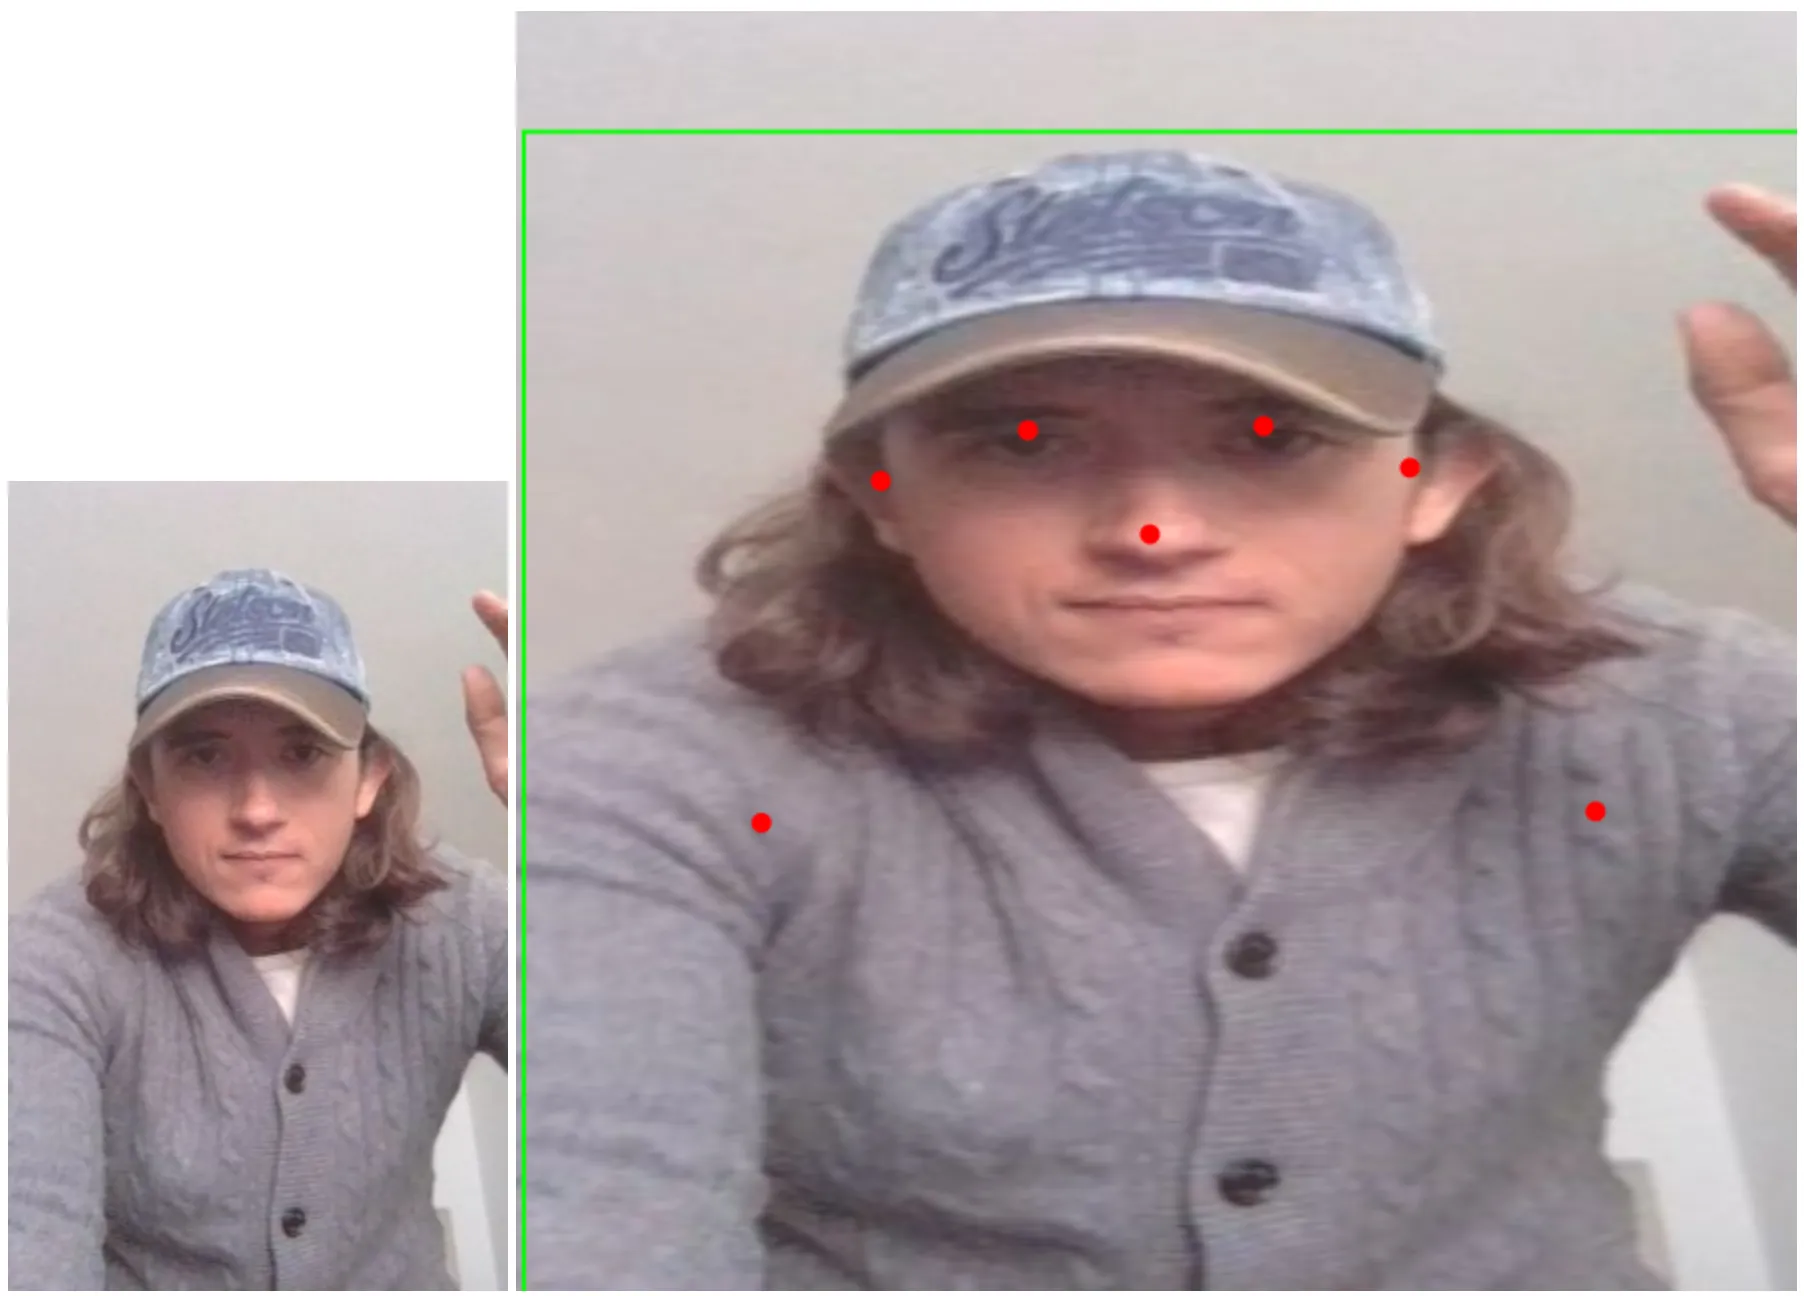
}And with this approach, we can now render the predictions on the original image without distortion or misplaced bounding boxes.
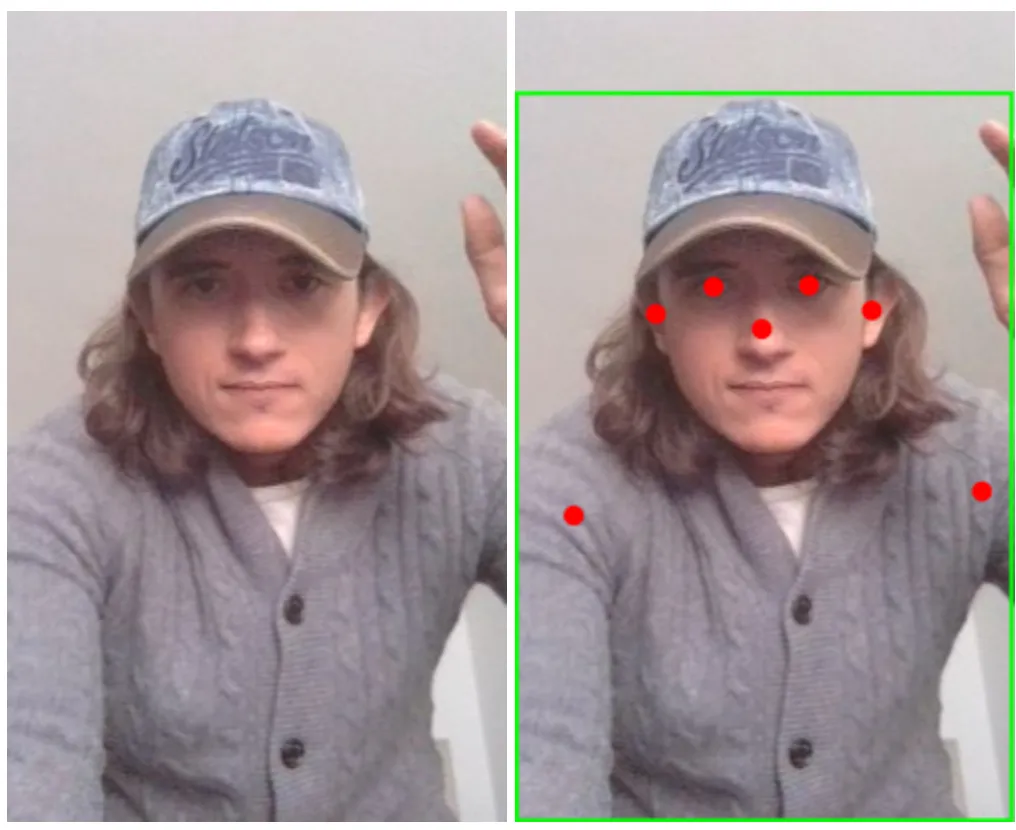
No matter the image dimensions or aspect ratio.
A quick note on memory management
When working with TensorFlow.js, it is important to manage memory properly to avoid memory leaks and performance issues. Tensors are allocated in GPU memory, and if they are not disposed of properly, they will accumulate over time.
There are two options to manage memory:
- Use the
disposefunction to manually release tensors when they are no longer needed. This can be cumbersome and error-prone, especially in complex applications where many tensors are created and used. - Use the
tidyfunction to automatically dispose of tensors created within its scope. This function only works with synchronous code, which is why in our implementation we usetensor.dataSync()instead oftensor.data(). This greatly simplifies memory management, as it automatically cleans up tensors created within its scope, but at the cost of speed, since async operations are more performant.
So remember to always dispose of tensors when they are no longer needed, either manually or using tidy to automatically clean up:
import { tidy, loadGraphModel, type Tensor3D } from "@tensorflow/tfjs";
async function main() {
  const image = document.querySelector("img")!;
  const canvas = document.querySelector("canvas")!;
  const modelURL = "/yolov8n-pose_web_model/model.json";
  const model = await loadGraphModel(modelURL);
  // ...
  tidy(() => {
    const { processedImage, transformParams } = processImageWithLetterboxing(
      image,
      model
    );
    const predictions = model.predict(processedImage) as Tensor3D;
    const bestPrediction = getBestPrediction(predictions);
    const scaledPrediction = scalePrediction(bestPrediction, transformParams);
    renderPrediction({
      canvas,
      source: image,
      ...scaledPrediction,
      width: transformParams.originalWidth,
      height: transformParams.originalHeight,
    });
  });
}
In this example, since all tensors are created within the tidy function, they will be automatically disposed of when the function finishes executing, even if they are created by other functions inside the call stack. If the tidy function returns a tensor, it will be the only tensor that is not disposed of automatically, so you can use it outside the tidy scope. If you wanted to use async operations, you would need to structure your code to clearly separate the synchronous and asynchronous parts, using tidy only for the synchronous parts and manually calling dispose for tensors created in the asynchronous ones.
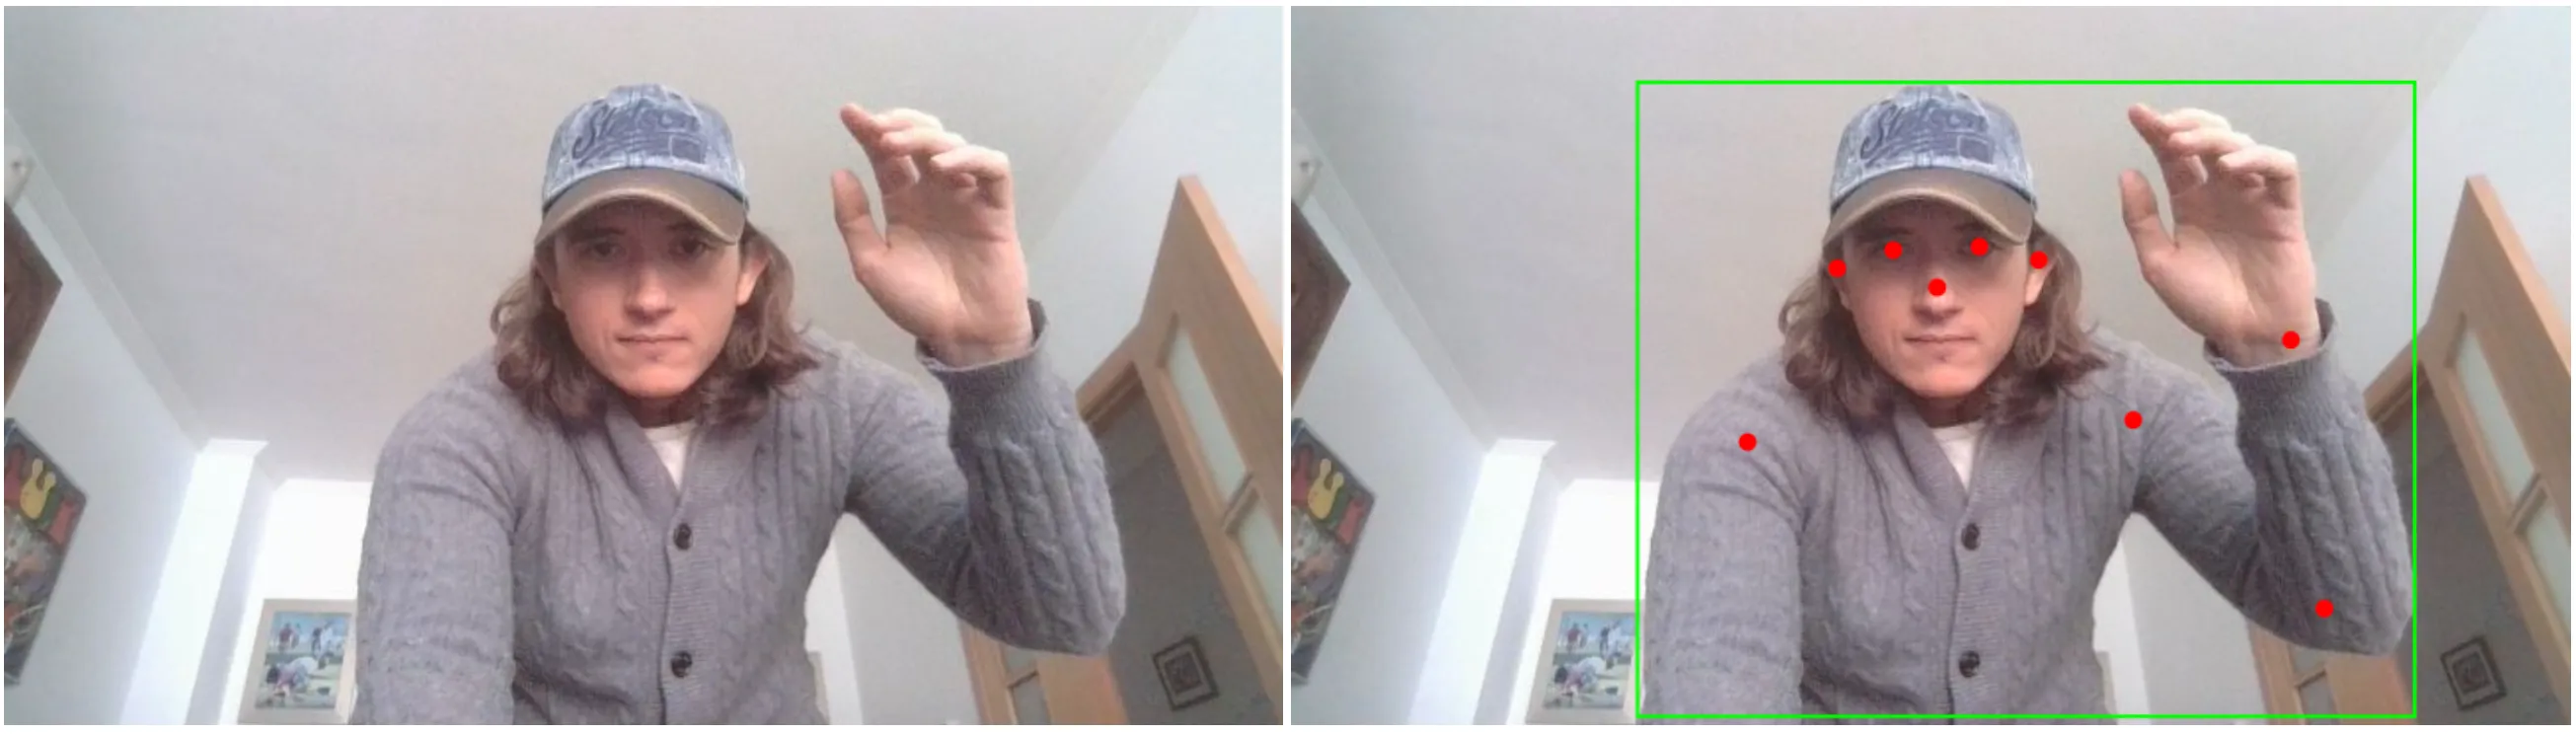
Putting it all together: live video
In this post, we have explored how to run computer vision models in the browser using TensorFlow.js and YOLOv8 pose estimation model. We have learned how to process images, run predictions, and render results on the canvas while maintaining the original image aspect ratio.
Let’s put it all together and create a live video stream with the model running in real-time. We will use the MediaStream API to get the video stream from the camera and process its frames on a loop with the requestAnimationFrame function.
We will start by positioning a canvas over a video element:
<style>
  .container {
    height: 700px;
    aspect-ratio: 3/4;
    background: black;
    position: relative;
    display: flex;
    align-items: center;
    justify-content: center;
  }

  video,
  canvas {
    width: 100%;
    height: 100%;
    object-fit: cover;
    position: absolute;
    top: 0;
    left: 0;
  }
</style>
<button>Start</button>
<div class="container">
  <video autoplay playsinline muted width="100%" height="100%"></video>
  <canvas width="100%" height="100%"></canvas>
</div>
And then create two utility functions to start and stop the video stream:
async function startVideo({
  video,
  width,
  height,
}: {
  video: HTMLVideoElement;
  width: number;
  height: number;
}) {
  if (window.innerHeight > window.innerWidth) {
    // Portrait mode: swap width and height
    [width, height] = [height, width];
  }
  const stream = await navigator.mediaDevices.getUserMedia({
    audio: false,
    video: {
      width,
      height,
      facingMode: "user",
    },
  });
  video.srcObject = stream;

  // Wait for the video to be loaded
  return new Promise<void>((resolve) => {
    video.addEventListener("loadedmetadata", () => resolve(), { once: true });
  });
}

function stopVideo(video: HTMLVideoElement) {
  const stream = video.srcObject as MediaStream;
  stream.getTracks().forEach((track) => track.stop());
  video.srcObject = null;
}
When requesting the user’s camera, we can specify the width and height of the video stream, and the facing mode (front or back camera). If the device is in portrait mode, we will swap the width and height to maintain the original aspect ratio.
We will also refactor our previous code to create a function processImage that will process frames of the video stream by calling itself recursively with requestAnimationFrame:
function processImage(
  canvas: HTMLCanvasElement,
  source: HTMLImageElement | HTMLVideoElement,
  model: GraphModel
): void {
  tidy(() => {
    // Process image with letterboxing to maintain aspect ratio
    const { processedImage, transformParams } = processImageWithLetterboxing(
      source,
      model
    );

    // Run model inference
    const predictions = model.predict(processedImage) as Tensor3D;

    // Extract best prediction and transform coordinates back to original image space
    const bestPrediction = getBestPrediction(predictions);
    const scaledPrediction = scalePrediction(bestPrediction, transformParams);

    // Render results on canvas
    renderPrediction({
      canvas,
      source,
      ...scaledPrediction,
      width: transformParams.originalWidth,
      height: transformParams.originalHeight,
    });

    // Schedule next frame processing
    requestAnimationFrame(() => {
      processImage(canvas, source, model);
    });
  });
}
And finally we can put it all together in the main function:
async function main(): Promise<void> {
  // Get DOM elements
  const toggle = document.querySelector("button")!;
  const video = document.querySelector("video")!;
  const canvas = document.querySelector("canvas")!;
  // Load YOLOv8 pose estimation model
  const modelURL = "/yolov8n-pose_web_model/model.json";
  const model = await loadGraphModel(modelURL);
  let running = false;
  toggle.addEventListener("click", async () => {
    if (running) {
      toggle.textContent = "Start";
      stopVideo(video);
    } else {
      toggle.textContent = "Stop";
      const { width, height } = video.getBoundingClientRect();
      // Since we are not specifying the width and height of the canvas and video
      // in the html, we need to manually override this attributes to configure
      // the actual size of the canvas and video buffers
      canvas.width = width;
      canvas.height = height;
      video.width = width;
      video.height = height;
      await startVideo({ video, width, height });
      requestAnimationFrame(() => {
        processImage(canvas, video, model);
      });
    }
    running = !running;
  });
}

// Start the application
main();
Notice how we are setting the width and height of the canvas and video elements to the actual size of the video stream, this is because we are not specifying the width and height of the canvas and video elements in the html, so we need to manually override this attributes to configure the actual size of the canvas and video buffers.
And that’s it! We have created a live video stream with the model running in real-time.
Remember to check the live demo and review the annotated final implementation in the source repository.